For various reasons, i recommend installing WordPress (WP) in a sub-directory rather than in the default root of the domain — such as in the /public_html or /htdocs directories. From here on out, i’m going to reference the root directory as mysite.com/.
If you already have a site installed at the root directory, perfect. This guide is exactly for that situation. If you do a fresh install, these can be adapted to it. Just follow along.
To begin, we’re going to move the existing WP files from the root mysite.com/ directory to a sub directory mysite.com/wp/. Once we’re done, this won’t change anything that your visitors see at https://mysite.com.
Moving forward, /blog will be swapped for /wp since that’s the setup for this site. Feel free to change the name from /blog to whatever you like on your own installation. Even though you visit macariojames.com, the WP files are actually in macariojames.com/blog, but you’d have no idea.
Instructions
— S/FTP to your server or go to wherever you’re developing the site locally.
— Inside the mysite.com root, create a new sub directory blog.
— From the WordPress Dashboard
- Go to Settings -> General
- Change WordPress Address (URL) to
mysite.com/blog - Make sure there’s no trailing
/ - Leave Site Address (URL) alone
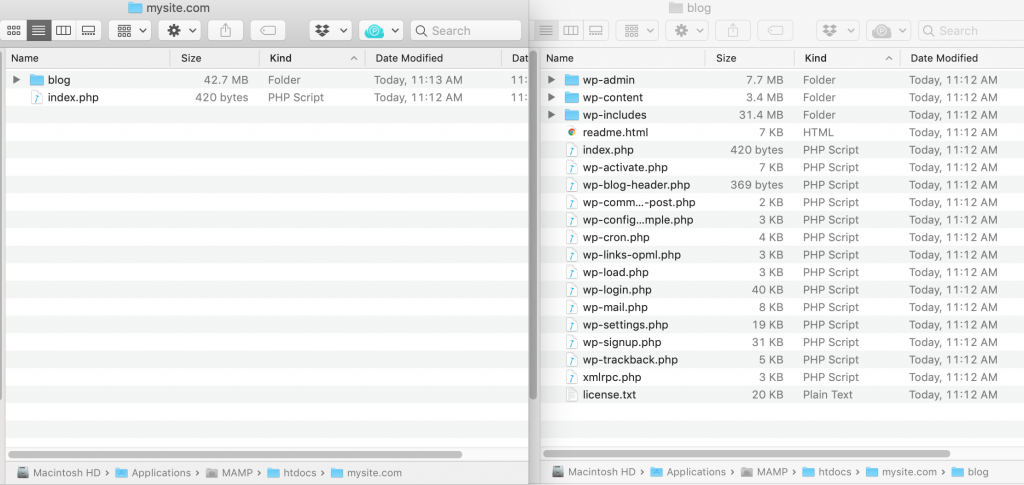
— Move the standard WP files from the mysite.com/ root directory into the new /blog directory. They can be seen in the image below with the three /wp-* folders and 16 files.
— Copy the index.php and .htaccess files that were moved to /blog down into the root mysite.com/ directory.
— Now, open the newly copied index.php file in the mysite.com/ root, and change this
require( dirname( __FILE__ ) . '/wp-blog-header.php' );
to this
require( dirname( __FILE__ ) . '/blog/wp-blog-header.php' );
making sure the leading ‘/’ is there.
So what’s going on?
When WP is loaded, instead of looking in the default directory for WP files, it goes up one directory to blog that you made for the files. The index.php file in the mysite.com/ root directory tells it to do so with the require() code.
— By now, WordPress will log you out, so log back into your Dashboard via the new mysite.com/blog/wp-admin url.
- Go to Settings -> Permalinks
- No need to change anything; just click Save/Update.
— Saving will automatically rewrite the .htaccess file for you, so all URLs and whatnot will work after this.
— Test out your domain that it still works correctly.
Below is a sample .htaccess of what it should look like after moving the WordPress files to the /blog directory and saving the permalinks.
<IfModule mod_rewrite.c>
RewriteEngine on
RewriteCond %{HTTP_HOST} ^(www.)?mysite.com$
RewriteCond %{REQUEST_URI} !^/blog/
RewriteCond %{REQUEST_FILENAME} !-f
RewriteCond %{REQUEST_FILENAME} !-d
RewriteRule ^(.*)$ /blog/$1
RewriteCond %{HTTP_HOST} ^(www.)?mysite.com$
RewriteRule ^(/)?$ blog/index.php [L]
</IfModule>
I hope this was useful and clear. If any questions or comments, please let me know below.
Cheers and peace.
If you found this post useful ...
